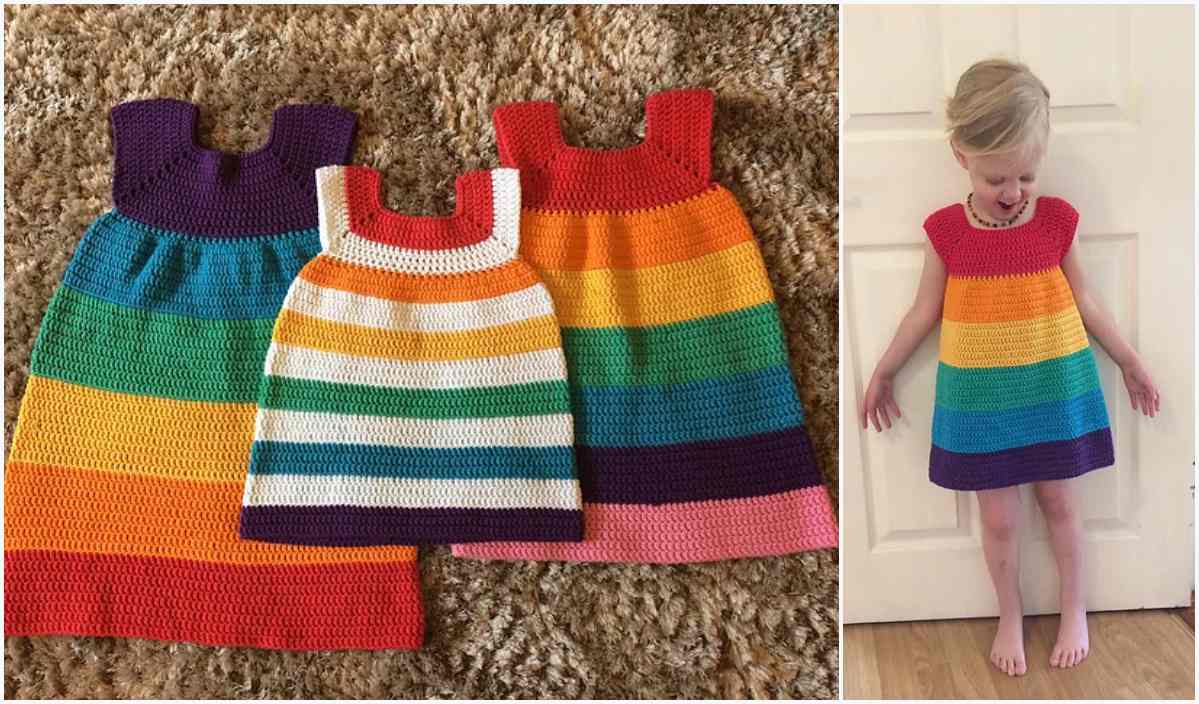
Rainbow Dress
Materials Needed
Yarn: DK weight (#3 Light) yarn in a soft, breathable fiber like merino wool, cotton, or a cotton-acrylic blend. Yardage estimates:
- Size S (32-34" bust): 900-1000 yards
- Size M (36-38" bust): 1100-1200 yards
- Size L (40-42" bust): 1300-1450 yards
Hook: 4.5 mm (US 7) or size needed to obtain gauge. A second hook 0.5mm smaller (4.0 mm) for the neckline edging is recommended.
Notions: Stitch markers (6-8), tapestry needle, scissors, measuring tape.
Gauge
4 inches (10 cm) square = 16 stitches x 10 rows in main shell pattern (see Special Stitches) after blocking.
To make a gauge swatch: Ch 22. Work Row 1-2 of the Main Shell Pattern (below) across 20 stitches + 2 turning ch. Repeat rows until piece measures 5". Block and measure center 4". Adjust hook size if necessary.
Abbreviations (US Terms)
- ch – chain
- sc – single crochet
- dc – double crochet
- tr – treble crochet (yarn over twice)
- sl st – slip stitch
- st(s) – stitch(es)
- sp – space
- sk – skip
- yo – yarn over
- RS – right side
- WS – wrong side
- rep – repeat
- prev – previous
- PM – place marker
Special Stitches:
- Shell (Sh): (2 dc, ch 1, 2 dc) all in same st or space.
- V-st (V-st): (dc, ch 1, dc) all in same st or space.
- Picot: ch 3, sl st in 3rd ch from hook.
Pattern Instructions
Important Sizing Note: This top is worked from the bottom up, in one piece to the armholes, then split for front and back. The pattern uses a 4-row repeat that creates a beautiful drape. S/M/L instructions are given in parentheses (S, M, L). If only one number is given, it applies to all sizes.
Foundation Chain
Ch 162 (182, 202) loosely. We will work in the foundation chain for Row 1.
Row 1 (RS): Dc in 4th ch from hook (counts as first dc), *sk next 2 ch, Shell (Sh) in next ch, sk next 2 ch, dc in next ch; rep from * across. Turn. Count: 26 (30, 34) shells + 27 (31, 35) single dc stitches = 53 (61, 69) total "posts" (each shell counts as one unit).
Row 2 (WS): Ch 3 (counts as dc), *dc in ch-1 sp of next Sh, ch 1, dc in same sp (this creates a V-st), sk next 2 dc of shell, dc in next single dc; rep from * across, ending with last dc in top of turning ch. Turn.
Row 3: Ch 3 (counts as dc), *sk next V-st (do not work into it), Shell in next single dc; rep from * across, ending with last Shell in top of turning ch. Turn.
Row 4: Ch 3 (counts as dc), *dc in ch-1 sp of next Sh, ch 1, dc in same sp (V-st), dc in next single dc; rep from * across, ending with dc in top of turning ch. Turn.
Row 5: Ch 3 (counts as dc), *Shell in next single dc, sk next V-st; rep from * across, ending with Shell in top of turning ch. Turn.
Note: Rows 2-5 form the 4-row pattern repeat. Row 2 and Row 4 are the same (V-st rows). Row 3 and Row 5 are the same (Shell rows). You will repeat Rows 2-5 for the body.
Body Section
Continue working Rows 2-5 until your piece measures the following from the foundation chain:
- Size S: 12 inches (30 cm)
- Size M: 13 inches (33 cm)
- Size L: 14 inches (35.5 cm)
End after completing a Row 4 (a V-st row, WS). Do not fasten off. Place a stitch marker at each end of this row to mark the bottom of the armholes.
Divide for Armholes
You will now work the Back and Front separately.
Back Panel
Row 1 (RS - Shell row): Ch 3, Shell in next single dc (this will be the first single dc after the marker), sk next V-st, *Shell in next single dc, sk next V-st; rep from * across until you have worked 13 (15, 17) Shells total (this is half the stitches). Leave remaining stitches unworked for the Front. Turn.
Row 2 (WS - V-st row): Ch 3, *V-st in ch-1 sp of next Shell, dc in next single dc; rep from * across, ending with dc in top of turning ch. Turn. You will have 13 (15, 17) V-sts.
Row 3 (RS - Shell row): Ch 3, *Shell in next single dc, sk next V-st; rep from * across, ending with Shell in top of turning ch. Turn.
Repeat Rows 2-3 of the Back Panel until the armhole measures:
- Size S: 7 inches (18 cm)
- Size M: 7.5 inches (19 cm)
- Size L: 8 inches (20.5 cm)
End after completing a Row 2 (WS, V-st row). Fasten off.
Front Panel
With RS facing you, join yarn with a sl st to the first unworked single dc after the Back panel stitches (at the armhole marker).
Row 1 (RS - Shell row): Ch 3, Shell in same st as join, sk next V-st, *Shell in next single dc, sk next V-st; rep from * across remaining stitches (13, 15, 17 Shells total). Turn.
Row 2 (WS - V-st row): Ch 3, *V-st in ch-1 sp of next Shell, dc in next single dc; rep from * across, ending with dc in top of turning ch. Turn.
Row 3 (RS - Shell row): Ch 3, *Shell in next single dc, sk next V-st; rep from * across, ending with Shell in top of turning ch. Turn.
Repeat Rows 2-3 of the Front Panel until the armhole is 2 rows SHORTER than the Back panel. End after completing a Row 2 (WS, V-st row). For example, if Back had 14 rows total, Front should have 12 rows at this point.
Front Neckline Shaping
Next Row (RS - Shell row, partial): Ch 3, Shell in next single dc, sk next V-st, rep from * across 4 (5, 6) more Shells (total 5, 6, 7 Shells). Turn, leaving remaining stitches unworked for the other side of the neck.
Right Shoulder (continue on these 5, 6, 7 Shells):
- Row (WS): Ch 3, *V-st in next Shell ch-1 sp, dc in next single dc; rep across (5, 6, 7 V-sts). Turn.
- Row (RS): Ch 3, *Shell in next single dc, sk next V-st; rep across (5, 6, 7 Shells). Turn.
- Work 1 more row of (WS V-st, RS Shell) — total 2 Shell rows after neck split. Fasten off.
Left Shoulder (work on remaining 7, 8, 9 Shells):
- With WS facing you, skip the center 1 Shell from the Front (this creates the V-neck dip), join yarn with sl st to the next single dc after the skipped Shell.
- Row (WS): Ch 3, *V-st in next Shell ch-1 sp, dc in next single dc; rep across (6, 7, 8 V-sts). Turn.
- Row (RS): Ch 3, *Shell in next single dc, sk next V-st; rep across (6, 7, 8 Shells). Turn.
- Work 1 more row of (WS V-st, RS Shell) — total 2 Shell rows after neck split. Fasten off.
Note: The Back panel has 13 (15, 17) Shells. The Front has 5+1+7 (6+1+8, 7+1+9) Shells = 13 (15, 17) total. The center 1 Shell is skipped for the V-neck.
Shoulder Seams
With RS together, use a tapestry needle and yarn to whip stitch or mattress stitch the shoulders together. Match the Shells from Front to Back. You will seam 5 (6, 7) Shells on each side, leaving the center 3 (3, 5) Shells of the Back unseamed for the back neck.
Finishing
Neckline Edging
Switch to the smaller 4.0 mm hook. With RS facing, join yarn at the left shoulder seam.
Round 1: Ch 1, sc evenly around the entire neckline (back neck, right shoulder, front V, left shoulder). Work 1 sc in each dc post, 1 sc in each ch-1 sp, and 2 sc in each row-end. At the bottom point of the V-neck (center front), work 3 sc in the same st to turn the corner. Join with sl st to first sc.
Round 2: Ch 1, *sc in next 2 sc, Picot (ch 3, sl st in 3rd ch from hook), sc in next 2 sc; rep from * around, adjusting as needed to keep the edge flat. At the V-neck point, work a Picot directly in the center sc. Join with sl st to first sc. Fasten off. Weave in ends.
Armhole Edging
With smaller hook, join yarn at the underarm marker.
Round 1: Ch 1, sc evenly around the armhole (about 1 sc per row-end and 1 sc per stitch). Join with sl st.
Round 2: Ch 1, *sc in next 2 sc, ch 1, sk 1 sc; rep from * around. Join with sl st. Fasten off. Repeat for second armhole.
Hem Edging (Optional)
With smaller hook, join yarn at one side seam of the foundation chain.
Round 1: Ch 1, sc evenly across the bottom edge (1 sc per foundation chain stitch). Join with sl st.
Round 2: Ch 1, (sc, ch 3, sc) in first sc, *sk next 2 sc, (sc, ch 3, sc) in next sc; rep from * around. Join. Fasten off.
Blocking
Wash gently in cool water with mild soap. Roll in a towel to remove excess water. Lay flat on blocking mats, pinning out the Shells to open up the lace pattern. Pay special attention to the V-neck point and the picot edge. Allow to dry completely (24-48 hours).
Tips
- Stitch Markers are Your Friend: Place a marker in the first and last Shell of every row. This pattern is easy to lose count on, and a marker at the edges will save you from having to recount across 60+ stitches when you make a mistake.
- Fabric Drape: This top is designed to have a relaxed, flowy fit. If you prefer a more fitted look, go down one hook size (to 4.0 mm) for the body section. If you want it even drapier and sheer, go up to 5.0 mm. Always check your gauge first.
- Customizing Depth: The V-neck depth can be adjusted. For a deeper V, start the neck shaping 4 rows earlier on the Front. For a shallower V, start 2 rows later. Simply reduce or increase the number of rows worked on the Front before dividing for the shoulders.