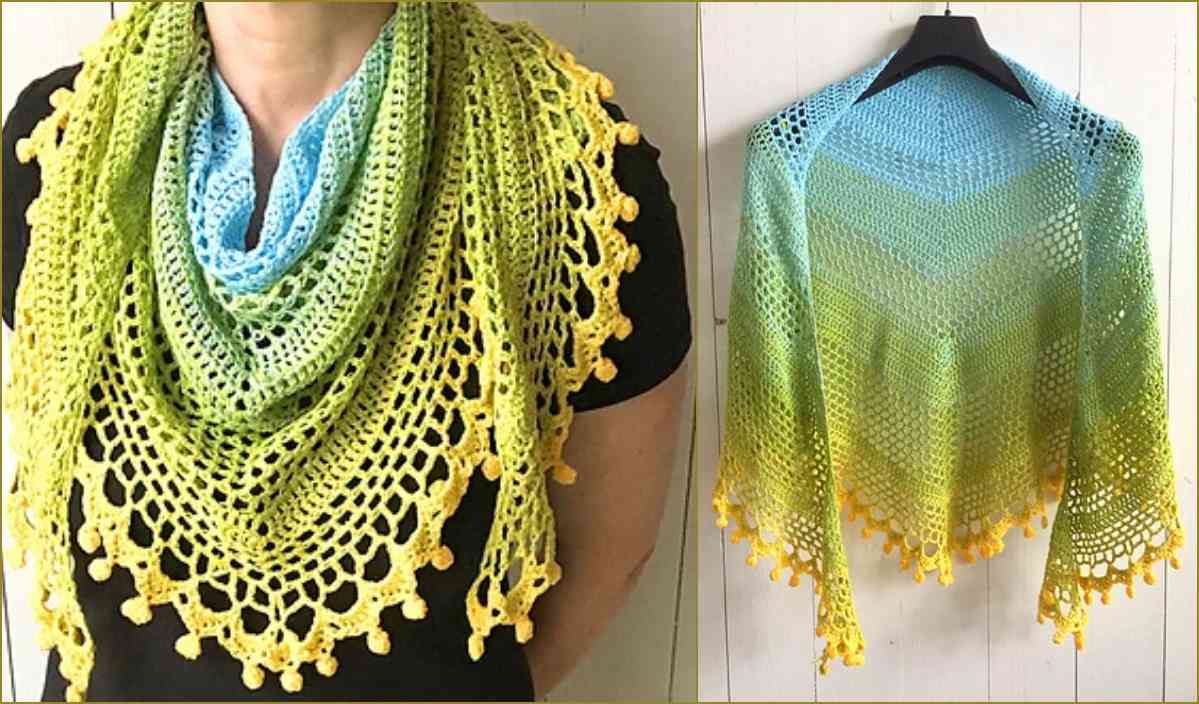
Pom Pom Happiness Shawl
Materials Needed
Yarn: DK weight (#3 Light) yarn in a smooth, non-fuzzy fiber (e.g., merino wool, cotton, or a blend). Yardage is approximate and may vary by gauge and tension.
- Size S (Bust 32-34”): 850-950 yards (approx. 4-5 skeins of 218 yd/100g)
- Size M (Bust 36-38”): 1000-1100 yards (approx. 5-6 skeins)
- Size L (Bust 40-42”): 1150-1250 yards (approx. 6-7 skeins)
Hook: Size G (4.0 mm) or size needed to obtain gauge.
Notions: Yarn needle for weaving ends, stitch markers (6-8 recommended), scissors, measuring tape. Blocking pins and mats (optional but recommended).
Gauge
Main Pattern Stitch (after blocking): 16 stitches x 8 rows = 4” x 4” (10 cm x 10 cm) in the shell stitch pattern described below.
To make a gauge swatch: Chain 20. Work Row 1 of the Shell Stitch pattern (see Pattern Instructions) across. Repeat Rows 2-4 until piece measures 5”. Block and measure the center 4” section.
Abbreviations (US Crochet Terms)
- ch – chain
- sc – single crochet
- dc – double crochet
- tr – treble crochet
- sl st – slip stitch
- sk – skip
- sp – space
- st(s) – stitch(es)
- RS – right side
- WS – wrong side
- shell – (2 dc, ch 2, 2 dc) all worked in the same stitch or space
- beg shell – beginning shell: ch 4 (counts as 1 dc + ch 2), then 2 dc in same st/sp
- V-st – (dc, ch 1, dc) all worked in the same stitch or space
Pattern Instructions
Important Sizing Note: This top is worked from the top down in one piece, with increases for the bust and shoulders. The final garment has a slightly A-line shape. Adjust hook size or repeat increase rows for a custom fit. The pattern gives instructions for Size S, with changes for M and L in parentheses [M, L].
Special Stitch Pattern: Shell Stitch (used for body)
Row 1 (RS): Work 1 shell in first st, *sk 2 sts, work 1 shell in next st; repeat from * across, ending with 1 dc in last st. Turn.
Row 2 (WS): Ch 1, sc in first dc, *ch 3, sc in ch-2 sp of next shell; repeat from * across, ending with ch 3, sc in top of turning ch. Turn.
Row 3 (RS): Ch 1, sc in first sc, *work 1 shell in next ch-3 sp, sc in next sc; repeat from * across, ending with sc in last sc. Turn.
Row 4 (WS): Ch 3 (counts as dc), *ch 2, sc in ch-2 sp of next shell*; repeat from * to * across, ending with ch 2, dc in last sc. Turn. (This row sets up for next shell row.)
Repeat Rows 1-4 for pattern.
Yoke (Worked flat, top-down)
Foundation Chain: Ch 83 (89, 95) loosely.
Row 1 (RS): Dc in 4th ch from hook (counts as 2 dc), *ch 1, sk 2 ch, (dc, ch 1, dc) in next ch (V-st made); repeat from * across to last 3 ch, ch 1, sk 2 ch, 2 dc in last ch. Turn. (You will have: 2 dc at each end, and 26 [28, 30] V-sts in between.)
Row 2 (WS): Ch 3 (counts as dc), dc in next dc (increase), *ch 1, work V-st in ch-1 sp of next V-st; repeat from * across to last 2 dc, ch 1, 2 dc in top of turning ch (increase). Turn.
Row 3 (RS): Ch 3, dc in next dc (increase), *ch 1, work V-st in ch-1 sp of next V-st; repeat from * across to last 2 dc, ch 1, 2 dc in top of turning ch (increase). Turn.
Row 4 (WS): Ch 1, sc in first dc, *ch 3, sk next dc, sc in ch-1 sp of next V-st; repeat from * across, ending with ch 3, sc in top of turning ch. Turn.
Row 5 (RS): Ch 1, sc in first sc, *work 1 shell in next ch-3 sp, sc in next sc; repeat from * across. Turn. (You now have shell stitches across the row.)
Rows 6-9 (S) [6-11 (M), 6-13 (L)]: Continue working in Shell Stitch pattern (Rows 2-4 of shell pattern) without further increases. The yoke should measure approximately 6” (7”, 8”) from foundation chain.
Divide for Armholes
Next Row (RS): Work across in Shell Stitch pattern as established until you have worked shells over the first 5 (6, 7) shells (this is the left front). Ch 4 (5, 6) for underarm, sk the next 6 (7, 8) shells (left armhole), work shells over the next 14 (16, 18) shells (back), ch 4 (5, 6) for underarm, sk next 6 (7, 8) shells (right armhole), work shells over the last 5 (6, 7) shells (right front). Turn.
Note: The ch 4/5/6 at underarms will be worked into the pattern on the next row.
Body (Worked flat, all sizes)
Row 1 (WS): Continue Shell Stitch pattern across all front, underarm chains, and back stitches. Work the underarm chains as follows: sc in each ch, then ch 3, shell in next sc, etc. Count your shells: you should now have 26 (30, 34) shells total across the row.
Rows 2-20 (S) [2-24 (M), 2-28 (L)]: Continue in Shell Stitch pattern (repeat Rows 1-4 of shell pattern) until body measures 12” (14”, 16”) from underarm, or desired length to hem. For a longer top, continue repeating the pattern until desired length is reached, adding more yarn as needed.
Final Row (RS): To create a clean edge, work 1 sc in each dc and 1 sc in each ch-2 sp across. Fasten off.
Straps (Optional – for a strappy back/side detail, or to create a halter)
Note: This top is designed with a wide neckline that can be worn off-shoulder, or you can add straps for more support. Instructions are for two simple straps.
Left Strap: With RS facing, attach yarn at the top left corner of the left front (at the neck edge). Ch 80 (90, 100) or desired length for strap. Sl st to the top left corner of the back piece (at the shoulder seam). Fasten off.
Right Strap: Repeat at right front corner to right back corner.
For a criss-cross back, attach left strap to right back corner, and right strap to left back corner, crossing them at the back.
Finishing
Weaving Ends
Using a yarn needle, weave in all loose ends securely on the wrong side of the fabric. Trim any excess yarn close to the weaving, being careful not to cut the fabric.
Blocking (Highly Recommended)
This pattern relies on blocking to open up the shell stitches and achieve the correct drape. Soak the garment in lukewarm water with a drop of mild soap for 15-20 minutes. Gently squeeze out excess water (do not wring). Lay flat on a blocking mat, gently pinning the top to the desired measurements (see sizing chart below). Pay special attention to the neckline and armholes, shaping them to lay flat. Allow to dry completely (24-48 hours).
Finished Measurements (after blocking):
- Size S: Bust: 34”, Length from underarm: 12”, Total length: 18”
- Size M: Bust: 38”, Length from underarm: 14”, Total length: 21”
- Size L: Bust: 42”, Length from underarm: 16”, Total length: 24”
Assembly (if adding straps)
After blocking, try on the top to adjust strap length. Sew straps securely to the back corners using the yarn needle and matching yarn. Weave in these ends as well.
Tips
- Check your gauge carefully. This top is designed to have a relaxed fit, but gauge directly affects the final size. If your gauge is tighter, your top will be smaller; if looser, it will be larger. Always make and block a gauge swatch before starting.
- Use stitch markers to mark the armhole division. When you reach the row where you divide for armholes, place a stitch marker at the beginning and end of each armhole section (the skipped shells). This helps ensure you don’t accidentally work stitches into the wrong area when joining the body.
- Customize the neckline. The foundation chain determines the width of the neckline. For a deeper front neckline, increase the number of chains at the beginning (add 6 chains = 2 more V-sts), and work an extra row of increases on the yoke. For a higher neckline, start with fewer chains. Always adjust yarn yardage accordingly.