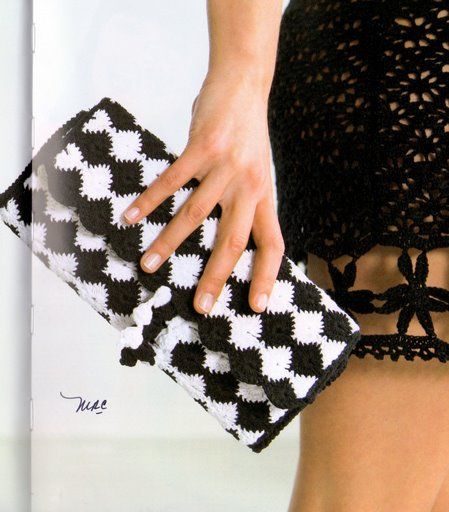
Sun Dial Stitch Crochet Clutch
Materials Needed
- Yarn: Approximately 250-300 yards (230-275 m) of a worsted weight (Category 4) cotton or cotton-blend yarn. A smooth, non-splitting yarn is recommended for stitch definition. Sample used: Lily Sugar'n Cream in "Ecru."
- Hook: Size H/8 (5.0 mm) crochet hook, or size needed to obtain gauge.
- Notions: Yarn needle for weaving in ends, stitch markers (optional, but helpful), one 1-inch (25 mm) magnetic snap closure, coordinating sewing thread and needle to attach the snap (or a heavy-duty fabric glue if preferred), and a small piece of felt or fabric for snap reinforcement (optional).
Gauge
14 half double crochet stitches x 10 rows = 4 inches (10 cm) square. Worked in the back loop only (BLO) for texture. Always check your gauge. Wash and block your swatch if you plan to wash the finished bag.
Abbreviations (US Terms)
- ch – chain
- sl st – slip stitch
- sc – single crochet
- hdc – half double crochet
- hdc blo – half double crochet in the back loop only
- sc2tog – single crochet 2 together (decrease)
- st(s) – stitch(es)
- rep – repeat
- RS – right side
- WS – wrong side
Pattern Instructions
Bag Body (Make 2 identical panels – Front and Back)
The bag is worked flat, in rows, from the bottom up. The unique texture comes from working every stitch in the back loop only (BLO), creating a subtle ribbed effect.
Foundation Row: Ch 31 loosely. (Foundation chain counts as the first row.)
Row 1 (RS): Hdc in the 3rd ch from hook (the 2 skipped chs count as the first hdc). Hdc in each remaining ch across. Turn. (30 hdc)
Row 2 (WS): Ch 1 (does not count as a stitch here or throughout). Hdc blo in each st across. Turn. (30 hdc)
Rows 3-30: Repeat Row 2. At the end of Row 30, fasten off, leaving a long tail (approx. 24 inches / 60 cm) for seaming. You will have a rectangle measuring approximately 8.5 inches (21.5 cm) wide by 12 inches (30.5 cm) tall.
Tip: To keep your edges straight, be sure to work the last hdc blo into the very last stitch of each row, which can sometimes be tight.
Side and Bottom Gusset
This piece is worked in the round to create a continuous strip that will connect the front and back panels.
Foundation: Ch 6 loosely.
Round 1: Sc in the 2nd ch from hook and in the next 3 chs. 3 sc in the last ch (turning corner). Now working on the opposite side of the foundation chain: sc in the next 3 chs. 3 sc in the last ch (the first ch you worked into). Do not join. You will work in a continuous spiral. Place a stitch marker in the first stitch of the round to keep track. (14 sts)
Round 2: Sc in the next 4 sts. 2 sc in each of the next 3 sts (the corner curve). Sc in the next 4 sts. 2 sc in each of the next 3 sts (the other corner curve). (20 sts)
Round 3: Sc in the next 5 sts. (2 sc in next st, sc in next st) three times. Sc in the next 5 sts. (2 sc in next st, sc in next st) three times. (26 sts)
Round 4: Sc in the next 6 sts. (2 sc in next st, sc in next 2 sts) three times. Sc in the next 6 sts. (2 sc in next st, sc in next 2 sts) three times. (32 sts)
Round 5: Sc in the next 7 sts. (2 sc in next st, sc in next 3 sts) three times. Sc in the next 7 sts. (2 sc in next st, sc in next 3 sts) three times. (38 sts)
Round 6: Sc in the next 8 sts. (2 sc in next st, sc in next 4 sts) three times. Sc in the next 8 sts. (2 sc in next st, sc in next 4 sts) three times. (44 sts)
The base now measures approximately 8.5 inches (21.5 cm) long by 4 inches (10 cm) wide. This should match the width of your bag panels.
Rounds 7-12: Sc in each st around. Do not increase. Continue in a spiral. (44 sts per round)
Round 13: Now we will begin to shape the sides of the gusset. Sc in each st around, but work the first and last 8 sts of this round (the short sides of the oval) in the front loop only (FLO). This creates a subtle fold line for the side edges. (44 sts)
Rounds 14-18: Sc in each st around. (44 sts per round)
Fasten off and weave in the starting tail from the foundation chain. Set the gusset aside.
Assembling the Bag
Step 1: Take one of the bag body panels (Front). With the RS facing you, pin the gusset to the panel. The gusset's long sides will run along the bottom and up the sides of the panel. The gusset's short, curved ends will form the bottom corners. The top edge of the gusset should align with the top edge of the panel.
Step 2: Using the long tail from the bag panel and a yarn needle, sew the gusset to the panel with a whip stitch. Work through the back loops of the gusset's sc stitches and through the BLO loops of the panel's hdc stitches. Start at the top center of one side, sew down the side, across the bottom, and up the other side. Leave the top edge open.
Step 3: Repeat the process to attach the second bag panel (Back) to the other side of the gusset. Ensure that both panels are aligned and that the RS of the panels are facing outward. Weave in all remaining yarn tails securely.
Bag Top & Closure
Round 1: With the bag still inside-out or right-side out (your choice, but RS out is easier for finishing), join your working yarn with a sl st to the top edge of the bag at the side seam. Ch 1. Sc evenly around the entire top opening, working through both the bag panel and the gusset. The goal is to create a neat, sturdy edge. Join with a sl st to the first sc. (Approx. 88-92 sts)
Round 2: Ch 1. Sc in each st around. Join with a sl st to the first sc. Fasten off and weave in the end.
Handle (Make 2)
Foundation: Ch 81 loosely.
Row 1: Sc in the 2nd ch from hook and in each ch across. Turn. (80 sc)
Row 2: Ch 1. Sc in each st across. Turn. (80 sc)
Row 3: Ch 1. Sc in each st across. Fasten off, leaving a long tail (approx. 20 inches / 50 cm) for sewing. (80 sc)
Fold the handle strip in half lengthwise so the edges meet. Using the long tail, whip stitch the two long edges together to form a tube. This creates a sturdy, flat strap. Repeat for the second handle.
Attaching the Handles: Position the handles on the front and back panels of the bag. The handles should be centered, approximately 3 inches (7.5 cm) apart from each other (measured from the inside edge of one handle to the inside edge of the other). Pin them in place. Sew each handle end securely to the inside of the bag, through the top sc rounds and into the panel fabric. Weave in all ends.
Finishing
Weaving Ends: Using a yarn needle, carefully weave in all remaining loose ends on the inside of the bag. Trim any excess yarn.
Blocking: If desired, lightly steam block the bag. Do not press down heavily, as this can flatten the BLO texture. Gently shape the bag and the handles, and allow it to dry completely. Blocking will even out the stitches and give the bag a professional, crisp look.
Adding the Magnetic Snap:
- Determine the center of the top edge on the inside of the front panel. Measure down approximately 1 inch (2.5 cm) from the top edge.
- Following the manufacturer's instructions for your magnetic snap, mark the fabric where the prongs will go. You may need to use a small piece of felt or fabric on the inside of the bag to reinforce the snap area.
- Carefully push the prongs of one half of the snap through the fabric (and the felt reinforcement). Open the prongs flat against the inside of the bag.
- Repeat for the other half of the snap on the back panel, ensuring the two halves align perfectly. Use a needle and thread to sew the prongs flat to the reinforcement fabric for extra security, or use fabric glue if your snap is the glue-in type.
- Allow the glue to dry completely before using the bag.
Tips
- Stitch Markers are Your Friend: When working the gusset in a continuous spiral, it is incredibly easy to lose your place. Use a locking stitch marker in the first stitch of each round and move it up as you go. This will save you from having to recount stitches constantly.
- Customize the Size: This pattern is easily adjustable. To change the width, add or subtract stitches in the foundation chain in multiples of 2. To change the height, add or subtract rows on the bag panels. For the gusset, you will need to adjust the base oval to match the new width. A wider bag will need more increase rounds on the gusset base; a taller bag will need more rows on the gusset sides.
- Lining for a Professional Finish: While not required, adding a fabric lining to this bag will give it a polished look, hide any interior yarn tails, and provide extra structure. Cut a piece of fabric to the exact dimensions of your bag panel plus seam allowances, sew a simple pouch, and hand-stitch it into the interior of the bag just below the top sc edging. This also helps the magnetic snap sit more securely.