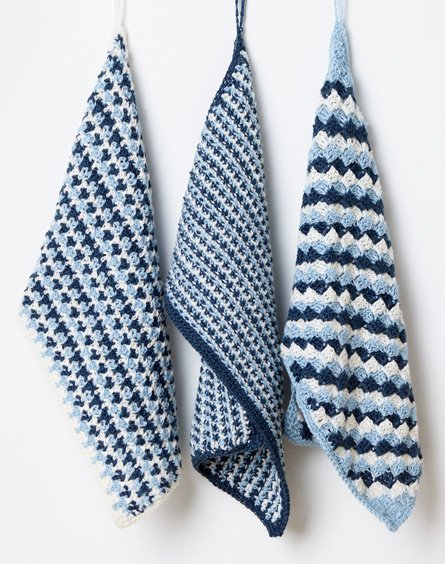
Linen Blend Crochet Tea Towels
Materials Needed
- Yarn: Approximately 450-500 yards of worsted weight (Category 4) cotton yarn. A smooth, mercerized cotton is ideal for stitch definition and durability. For the sample: 2 skeins (each 250 yds) of Lily Sugar’n Cream in “Ecru” (Color A) and 1 skein of “Teal” (Color B).
- Crochet Hook: Size H/8 (5.0 mm) or size needed to obtain gauge.
- Notions: Yarn needle for weaving ends, scissors, stitch markers (optional).
- Finished Size: Approximately 14 inches wide x 18 inches tall, after blocking.
Gauge
In pattern stitch (alternating front loop and back loop single crochet), worked flat: 4 inches = 16 stitches and 12 rows. Always check your gauge. If your piece is too large, use a smaller hook. If too small, use a larger hook.
Abbreviations (US Terms)
- ch: chain
- sc: single crochet
- sc-flo: single crochet in the front loop only
- sc-blo: single crochet in the back loop only
- dc: double crochet
- st(s): stitch(es)
- sk: skip
- rep: repeat
- RS: right side
- WS: wrong side
- sl st: slip stitch
- rem: remaining
Pattern Instructions
Notes: This dishcloth is worked from the bottom edge upward in rows, then finished with a contrasting border. The main body uses a simple textured ribbing created by alternating front-loop and back-loop single crochet stitches, which gives it a woven look and excellent scrubbing texture. The border is worked in a single crochet and chain loop edging. Do not turn your work at the end of each row for the border; you will work in continuous rounds.
Main Body (Color A)
Foundation Row: With Color A, ch 57 loosely. (This creates an even number of stitches after the turning chain.)
Row 1 (RS): Sc in the 2nd ch from hook and in each ch across. Turn. (56 sc)
Row 2 (WS): Ch 1 (does not count as a st). Working in the back loop only of each st, sc in the first st and in each st across. Turn. (56 sc-blo)
Row 3 (RS): Ch 1. Working in the front loop only of each st, sc in the first st and in each st across. Turn. (56 sc-flo)
Row 4 (WS): Repeat Row 2 (sc-blo across).
Row 5 (RS): Repeat Row 3 (sc-flo across).
Rows 6-48: Repeat Rows 2-5 consecutively. You will work a total of 48 rows from the foundation. The piece should measure approximately 14 inches wide and 16 inches tall (it will grow slightly with the border). Fasten off Color A, leaving a 6-inch tail. Weave in the end from the foundation row, but do not weave in the final tail yet.
Border (Color B)
Round 1 (RS): With RS facing, join Color B with a sl st to any corner of the dishcloth. We will work into the edges of the rows along the sides. Note: For the side edges, you will work 1 sc into the end of each row (the side of the sc from the previous rows).
- First Side: Ch 1 (does not count as a st). Work 1 sc in the same corner st. Then, work 1 sc into the side edge of each of the next 47 rows. (48 sc along the side).
- Bottom Edge: Work 1 sc in the corner, then work 1 sc in each of the 56 foundation chain stitches across the bottom. (56 sc + 1 corner sc = 57 sc along bottom).
- Second Side: Work 1 sc in the corner, then work 1 sc into the side edge of each of the next 47 rows. (48 sc along the side).
- Top Edge: Work 1 sc in the corner, then work 1 sc in each of the 56 stitches across the top (the last row you worked). (56 sc + 1 corner sc = 57 sc along top).
- Join with a sl st to the first sc of the round. (Total: 48 + 48 + 57 + 57 = 210 sc).
Round 2: Ch 1. Sc in the same st (the first sc of the previous round). *Ch 3, sk 2 sts, sc in the next st.* Repeat from * to * around the entire dishcloth. At the end of the round, ch 3, sk the last 2 sts, and join with a sl st to the first sc. (You will have 70 ch-3 loops).
Round 3: Sl st into the first ch-3 space. Ch 1. Work (sc, hdc, dc, hdc, sc) into each ch-3 space around. Join with a sl st to the first sc. (70 small shells). Fasten off Color B, leaving a 6-inch tail.
Finishing
- Weave in Ends: Use your yarn needle to carefully weave in all remaining tails (the beginning tail from Color A, the tail from the end of the body, and the tail from the border). Weave them through the back of the stitches for about 2-3 inches, then trim close to the fabric.
- Blocking (Optional but Recommended): If you used cotton yarn, blocking helps even out the stitches and gives the dishcloth a professional, flat finish. Fill a sink with cool water and add a drop of mild soap. Submerge the dishcloth for 10-15 minutes. Gently squeeze out excess water (do not wring). Lay flat on a towel, roll up to remove more moisture, then unroll and shape to the correct dimensions (14” x 18”). Pin the corners if necessary to ensure straight edges. Allow to air dry completely.
- Final Touch: If desired, you can add a small hanging loop. Cut a 6-inch length of Color B. Fold it in half, insert the loop through a corner stitch, and pull the ends through the loop. Tie a knot and trim ends.
Tips
- Maintaining the Ribbing: The alternating front-loop and back-loop rows create the ribbing texture. It is very important to work ONLY into the indicated loop (front or back) and not through both loops. This will create a thick, bouncy fabric that is excellent for scrubbing and dries quickly.
- Counting Rows: Because the pattern alternates rows of sc-flo and sc-blo, the right side (RS) and wrong side (WS) will look slightly different. The RS rows (sc-flo) will have a more pronounced “ridge” on the front. To keep your rows straight, place a stitch marker on the RS of your work after Row 1. This will help you know which row you are about to work.
- Border Evenness: When working the border into the side edges, ensure you are inserting your hook into the side of the stitch at the very edge of the row. Do not skip rows, and try to keep the tension consistent. If your side edges are too tight, your dishcloth will bow. If too loose, it will ruffle. A consistent gauge here is key for a perfect rectangle.