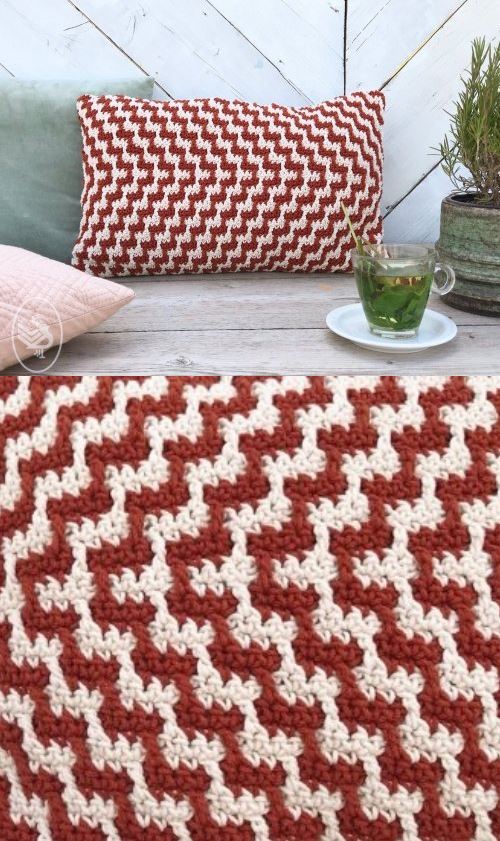
Free Crochet Pattern for a Chevron Cushion
Materials Needed
- Yarn: 2 skeins (approx. 360 yards / 330 meters total) of worsted weight (#4 Medium) cotton yarn. A smooth, non-fluffy cotton like Lily Sugar ‘n Cream or Lion Brand Kitchen Cotton works best for good stitch definition and absorbency. We used approximately 180 yards per color (Color A and Color B), though you can use a single color or up to four different colors for the stripes.
- Crochet Hook: Size H/8 (5.0 mm), or size needed to obtain gauge.
- Notions: Tapestry needle for weaving ends, scissors, stitch markers (optional).
Gauge
4 inches x 4 inches = 14 half double crochet (hdc) stitches x 10 rows worked in the back loop only (blo). Gauge is crucial for achieving the correct finished size and fabric drape. Always make a gauge swatch and adjust your hook size if necessary.
Abbreviations (US Terms)
- ch: chain
- st(s): stitch(es)
- sl st: slip stitch
- sc: single crochet
- hdc: half double crochet
- blo: back loop only
- sk: skip
- rs: right side
- ws: wrong side
- rep: repeat
- rem: remaining
- FO: fasten off
Pattern Instructions
Project Overview
This textured, modern dishcloth is worked flat in rows from the bottom up. It features a clean, ribbed texture created by working half double crochet stitches through the back loop only. The pattern uses simple two-row color stripes (or a solid color if you prefer) and finishes with a neat single crochet border. The final piece is approximately 9 inches wide by 9 inches tall, making it perfect for hand-washing dishes or as a decorative kitchen trivet.
Step 1: Foundation Chain
With Color A (or your main color): Chain 32 stitches loosely. You will work your first row into this chain. If you tend to chain tightly, use a hook one size larger for the foundation chain only, then switch back to your 5.0 mm hook for the rest of the project.
Step 2: Row 1 (Right Side)
Hdc in the 3rd ch from your hook (the 2 skipped chs count as your first hdc). Hdc in each ch across. You will have a total of 30 hdc stitches (including the starting ch-2). Turn your work.
Step 3: The Body Pattern (Ribbed Texture)
This section creates the main fabric. You will work a simple repeat of 2 rows for the stripe pattern.
Row 2 (WS) – Color A: Ch 2 (counts as first hdc, here and throughout). *Hdc in the back loop only (blo) of the next st.* Rep from * to * across. Hdc in the top of the turning ch from the previous row (this is the 2nd ch of the ch-2). Turn. (30 sts)
Row 3 (RS) – Color A: Ch 2. Hdc in the blo of each st across. Hdc in the top of the turning ch. Turn. (30 sts)
Row 4 (WS) – Change to Color B: Fasten off Color A, leaving a 6-inch tail for weaving. Join Color B with a sl st in the top of the turning ch. Ch 2 (counts as first hdc). Hdc in the blo of each st across. Hdc in the top of the turning ch. Turn. (30 sts)
Row 5 (RS) – Color B: Ch 2. Hdc in the blo of each st across. Hdc in the top of the turning ch. Turn. (30 sts)
Row 6 (WS) – Change to Color A: Fasten off Color B, leaving a 6-inch tail. Join Color A with a sl st in the top of the turning ch. Ch 2. Hdc in the blo of each st across. Hdc in the top of the turning ch. Turn. (30 sts)
Step 4: Continue the Stripe Pattern
Repeat Rows 2 through 6 (changing colors every 2 rows as described) until your piece measures approximately 8.5 inches from the foundation edge, ending after completing a wrong side (WS) row with your stripe color. Do not fasten off. You should have worked a total of about 22-24 rows (11-12 stripes of 2 rows each), depending on your tension.
Final Body Row (RS): If your last completed row is a WS row, work one more RS row in the same color: Ch 2, hdc in blo across, hdc in turning ch. Turn. Do not fasten off.
Step 5: Edging / Border
The border is worked in single crochet around the entire perimeter of the dishcloth. This step is worked with the final color you used on the body (you can also join a new color for contrast).
Round 1: Ch 1 (does not count as a stitch). Work 1 sc in each st across the top edge (30 sc). When you reach the corner, work 3 sc in the corner space (the side of the last hdc).
Now, rotate your work to work down the left side. Work 1 sc evenly into the side of each row end. For a clean look, work 1 sc into the side of each hdc row and 1 sc into the space between the stripes. You should have approximately 1 sc per row. Aim for about 22-24 sc down the side. Work 3 sc in the next corner (the corner of the foundation chain).
Rotate to work across the bottom edge. Work 1 sc in the back loop of each foundation chain st across (30 sc). Work 3 sc in the next corner.
Rotate to work up the right side. Work 1 sc into the side of each row end, matching the count from the left side. Work 2 sc in the starting corner (the one where you began the border). Join with a sl st to the first sc of the round. (Approximately 108-112 sc total)
Round 2 (Optional, for a thicker border): Ch 1. Work 1 sc in each sc around, working 3 sc in each of the 4 corner sc. Join with a sl st to the first sc. Fasten off, leaving a 6-inch tail for weaving.
Finishing
- Weave in Ends: Using a tapestry needle, weave in all yarn tails from the color changes and the border. Weave them securely into the back of the stitches for about 2 inches, then trim the excess. To make the back look as neat as the front, weave the tails diagonally through the bumps of the hdc stitches.
- Blocking (Highly Recommended): This step evens out the stitches and gives the dishcloth a professional, flat finish. Fill a sink or basin with lukewarm water and a drop of mild soap. Submerge the dishcloth for 10-15 minutes. Gently squeeze out the excess water (do not wring). Lay the dishcloth flat on a dry towel, roll the towel up to remove more moisture, then unroll and lay the dishcloth on a blocking mat or a dry towel. Gently shape it to a perfect 9-inch square, smoothing the edges and corners. Pin the corners if desired. Allow it to air dry completely.
Tips
- Maintain Consistent Tension: The ribbed texture looks best when your tension is even. If you find your edges are curling, try loosening your turning chain (ch 2) slightly. The back-loop-only stitch naturally creates a fabric that is less prone to curling than regular hdc.
- Color Change Trick: To avoid a messy jog in the stripes, when you join a new color at the beginning of a WS row, make sure to pull the new yarn tail tightly to the back of the work. A neater method is to fasten off the old color, then insert your hook into the top of the turning ch, yarn over with the new color, and pull through to make a sl st join. Then ch 2 and proceed.
- Customize the Size: This pattern is easily adjustable. For a larger dishcloth or a small placemat, simply chain more stitches at the start (in multiples of 1) and work additional rows. Remember to adjust your yarn amounts accordingly. For a smaller, scrubby cloth, chain 22 for a 7-inch square.